Level Up Your Note-Taking with LLMs
October 09, 2025

Dependency Injection in ASP.NET
Introduction
The five principals of object oriented design (known by the acronym of SOLID) are a good rule of thumb to follow when designing software. In this article, we are going to concentrate on the “D” in SOLID, the Dependency Inversion Principle, and how that can make your software easier to maintain and more testable. The examples provided are specific to an ASP.NET MVC application, but the principles discussed can be applied to software written in any language.
Classes and Dependencies
One class depending on another, or class coupling, does not follow the Dependency Inversion Principle and should be avoided when designing an application. If you are “newing” objects in a class, then you are tightly coupling your classes! This can lead to maintenance problems because if something changes in one class, it can affect the other class.
In the example below, I am creating a new instance of my data repository (which follows the Repository Pattern) and calling the GetAll method to return all my chili cook off entries. This is strongly coupling my data repository to my controller.

To avoid class coupling, a single implementation should be used where objects depend on abstractions, not concretions. In the example below, rather than calling the repository directly, we call the interface to the repository. This removes the dependency on the concrete implementation of the repository.

In the example above, while we have solved the class coupling problem, we have created a different problem with being able to effectively maintain this code. What if instead of 1 repository class in our application, we had 10 classes? How many places in our code would we have to instantiate those 20 classes? This would quickly become unwieldy if the implementations changed and we had to trace back. As we will see later, dependency injection containers can help with this problem.
Dependency Injection Explained
Dependency injection is an architectural pattern designed to easily satisfy a class’ dependencies by having objects that do not create other objects on which the rely to do their work. It allows us to write decoupled code that eases deployment of components and facilitates testing. Typically, you’ll want to use a dependency injection container to facilitate implementation of this pattern. Although you can write your own, there is no need to reinvent the wheel as you have many choices in containers that work well in .NET.
Dependency Injection Containers
A dependency injection container is a repository for definitions typically relating an abstraction to a concrete class. It provides two key pieces of functionality by giving us a facility for registering classes and for resolving a request. In short, it automatically creates objects based on the request and injects them when required with no coding. This makes it really easy to manage dependencies in our application in a simple and effective way. The container handles managing all the requests between classes and injecting variables into the interface for you.
There are many great dependency injection containers available for .NET and MVC 6 even has a simple dependency injection container built right in and ready to use. Examples of dependency injection containers you can use include Ninject, Castle Windsor, StructureMap, and AutoFac. These are all available via NuGet packages in Visual Studio and they all have a lot of support behind them but there are differences in how they are implemented and their features. I personally prefer Ninject which I think is really easy to implement and use.
To get started, install the Ninject and Ninject.MVC5 NuGet packages in your solution.
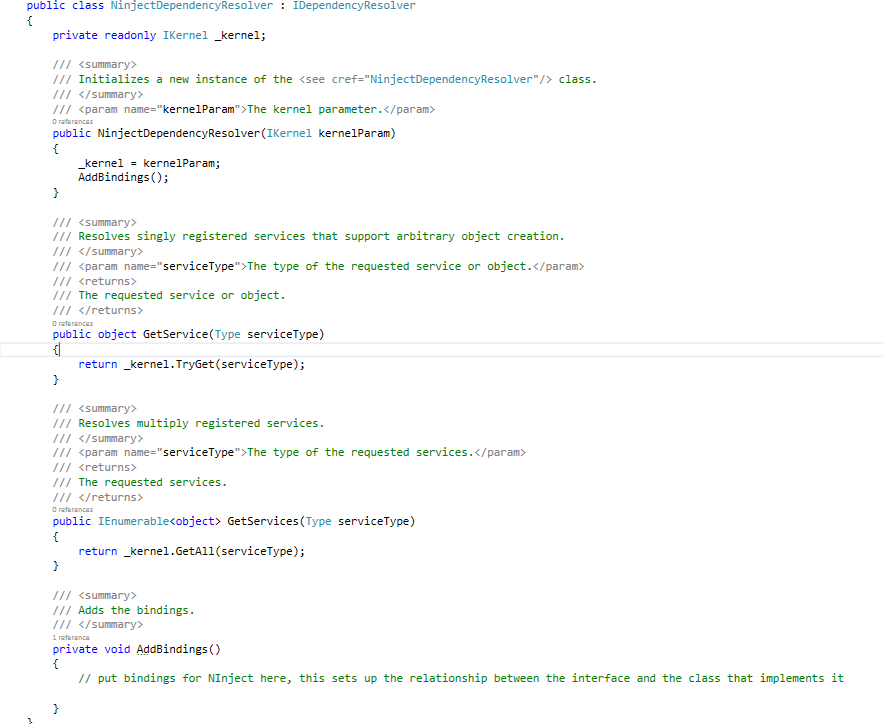
To configure Ninject, first create a custom dependency resolver so MVC can create instances of classes it needs to service requests. This is just the basic plumbing code that allows Ninject to do its job. Create a new class file called “NinjectDependencyResolver.cs" in a new folder called “Infrastructure” and enter the following code.

Next, add bindings in the AddBindings method to setup relationships between the interface and the class that implements the interface. In the example below, we are creating a relationship between our data repository interface and the repository class that implements the interface.

Finally, you must register the custom dependency resolver you created. By registering it, you will create a bridge between Ninject and the MVC Framework. When you install the Ninject.MVC5 package, it creates a class file “NinjectWebCommon.cs” in the App_Start folder. Edit that class and enter the following code in the RegisterServices method.

Now you are ready to put the container to work. In the example below we inject the repository interface into the controller’s constructor which breaks the controller’s dependency on our repository. Note that we don’t have to write any code to pass in the interface to the controller. Ninject handles that for us automatically.

Now we can call the repository in our controller in a loosely coupled way.

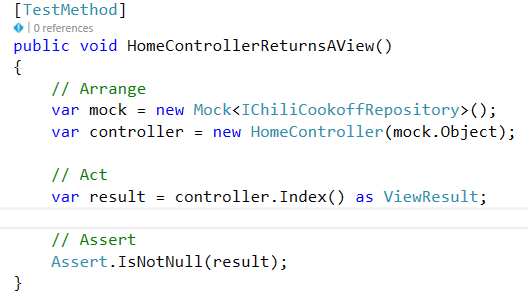
And we can also effectively create a unit test for our controller with no dependency on the repository. (Note that I am using the Moq NuGet package to create a mockup of the repository, which lets us test controller methods independently of the repository.)

Conclusion
Using interfaces to build decoupled components and using a dependency injection container is essential to writing software that is easy to maintain, extend, and test.
