Level Up Your Note-Taking with LLMs
October 09, 2025

Getting Started with Entity Framework 6 Code First
Introduction
Entity Framework 6 is a stable and mature ORM that should be considered for most .NET applications. As an ORM, Entity Framework provides an abstraction layer between your code and the database freeing you of most of the database design concerns and allowing you to concentrate your efforts on the application. Other .NET ORMs to consider include Dapper, a simple and lightweight object mapper, and NHibernate. Entity Framework has several workflows to choose from which will be explained in the next section but for this article, we’ll focus on Code First.
Entity Framework 6 Workflows
Once you have made the choice to use Entity Framework for your application, you have to make another decision about which workflow to use.
Model First
The Model First workflow allows the developer to use a visual designer to create a database design that ends up in a .EDMX file. Through the designer, the developer defines all the database objects and relations then generates the database objects based on the model. This is a good approach when there is no existing database (i.e. a “green field” application) and when you want to visually see or communicate the database model.
Database First
The Database First workflow allows the developer to reverse engineer an existing database into a .EDMX file. The model and objects are automatically created based on the database which gives this approach the least flexibility but also the least amount of work for the developer to do. This is a good approach for an existing application that already has a database.
Code First
The Code First workflow allows the developer to generate the database from POCO (Plain Old CLR Objects). The developer creates a database context and entities in class files then generates the database from those files. This is a good approach for a new application but it can also be used for an existing application with an existing database.
Installation
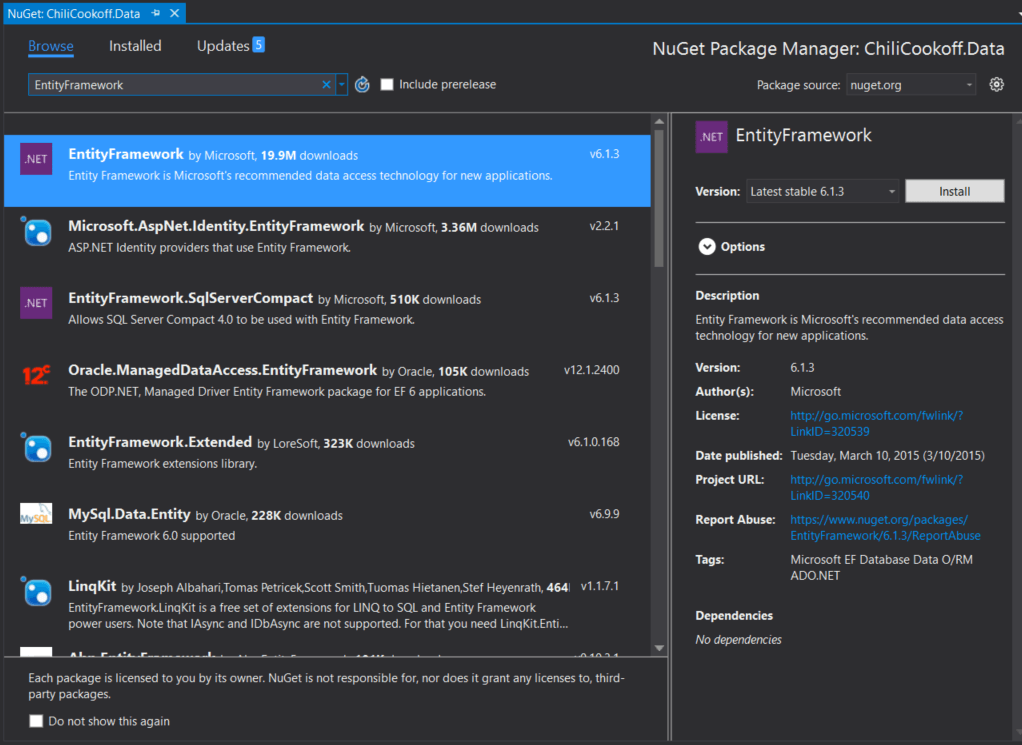
To get started with Entity Framework Code First, you first need to install the Entity Framework NuGet package. You can do this from the NuGet Package Manager or the Package Manager Console window.
To install from the NuGet Package Manager, follow these steps.
- In Visual Studio, right click on the solution and select Manage NuGet Packages….
- In the search box, type in “EntityFramework.”
- Click on EntityFramework in the selection results, then the Install button in the right side frame. The latest stable version will be preselected for you.
To install from the NuGet Package Manager Console window, follow these steps.
- In Visual Studio, go to the Tools menu, click NuGet Package Manager and then click Package Manager Console.
- In the Package Manager Console window type: Install-Package EntityFramework

Getting Started
With the Entity Framework package installed, we can get started designing our entities. It is a good idea to create a separate class library project for your data objects and append “.Data” to the name of your application. This separates your database logic from the rest of your application and also makes it obvious what the purpose of the project is.
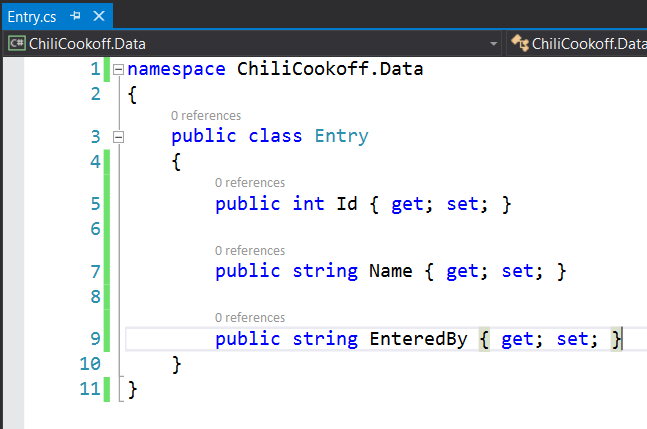
For the purposes of this article, we will be creating a sample MVC 5 application that allows users to vote in a chili cook off. We’ll start off by creating an entity for the chili entries. In the ChiliCookoff.Data project, create a new class called “Entry.cs” and enter the code below.
Now we’ll add another new class to capture the votes. In the ChiliCookoff.Data project, create a new class called “Vote.cs” and enter the code below.
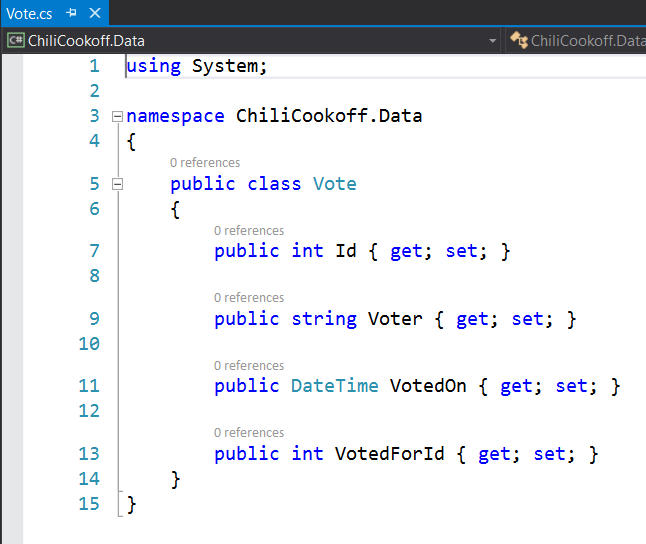
Note that a property named “Id” or <class name> + “Id” will automatically be interpreted by Entity Framework as the primary key in the database. If you do not want to follow this naming convention, you can use the “Key” attribute to force Entity Framework to use a specific property (attributes are discussed later in this article).
Creating the Database Context
In addition to having entity classes that defines the tables in the database, Entity Framework needs a database context class to assist with database functionality and to provide the developer a way to customize behavior.
In the ChiliCookoff.Data project, create a new folder called “DAL” (for Database Access Layer) then in the DAL folder create a new class called “ChiliCookoffContext.cs” and enter the code below.
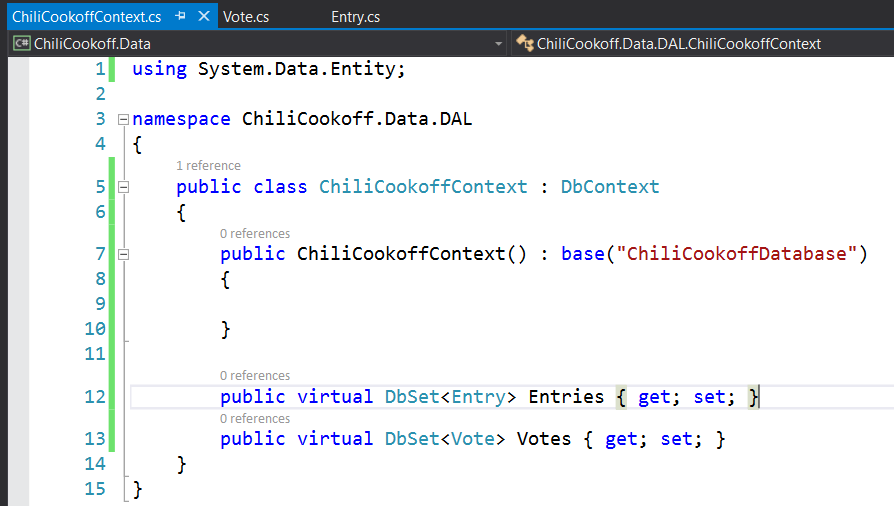
Some things to note from the code above in the database context.
- The ChiliCookoffContext.cs class derives from the Data.Entity.DbContext class which acts as a bridge between your entity classes and the database.
- The base override for the constructor should contain the connection string, stored in your Web.config file, for the database you’ll be using. If you don’t specify one, Entity Framework will look for one that is named the same as your Database Context class name, in this case “ChiliCookoffContext”.
- You need to define DbSet property for each Entity class you create in order to access it via the DbContext.
Adding Data to the Database
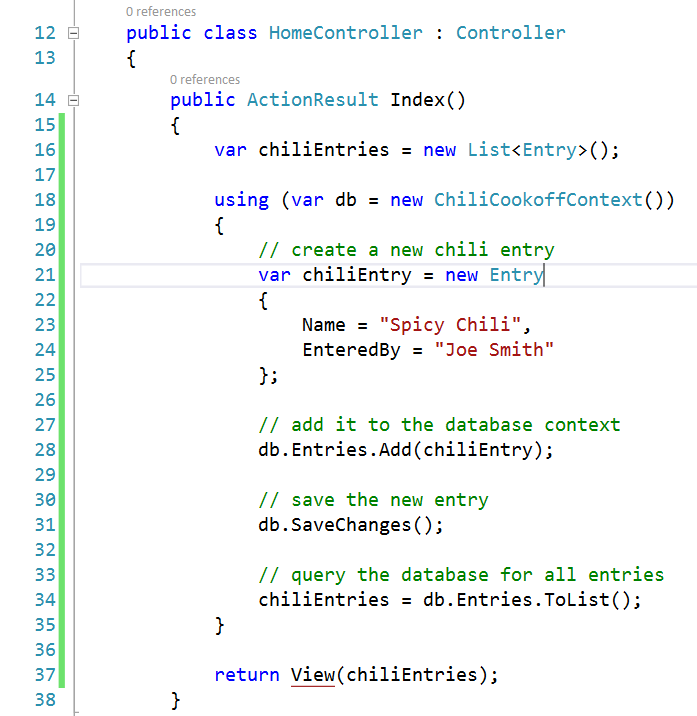
With the entities and database context created, we can now write code to add data to the database and retrieve data from the database. In this very simple example show below, we’re writing code in the HomeController Index ActionResult to add a new chili entry then retrieve all chili entries from the database. Then we’ll pass the list of chili entries to the home page for display.
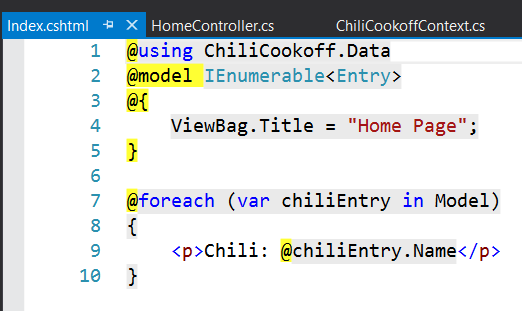
To display the chili entries in the database on the home page, I added the following code to the home view, which passes in a List of type <Entry> and uses a foreach to iterate over the list and display the entry name.
Adding Data to the Database
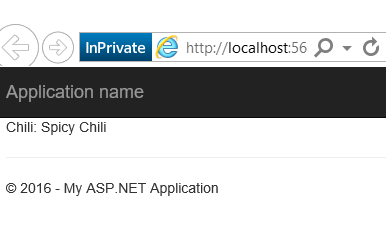
When the application is built and run, the chili entry should be displayed on the home page.
But wait, there is now data in the database. So how did the database get created? When the application is run and a database call is made, DbContext will compare the local entities against the database and deploy or update the database model for you. DbContext looks at all the DbSet properties defined in the DbContext class and figures out how to create table names, field names, field types, indexes, etc. This is the power of Code First. You don’t have to do anything to create the database or database schema. By convention, Code First is smart enough do the work for you! Note that his behavior can be overridden using Data Annotations or the Fluent API as we’ll see later.
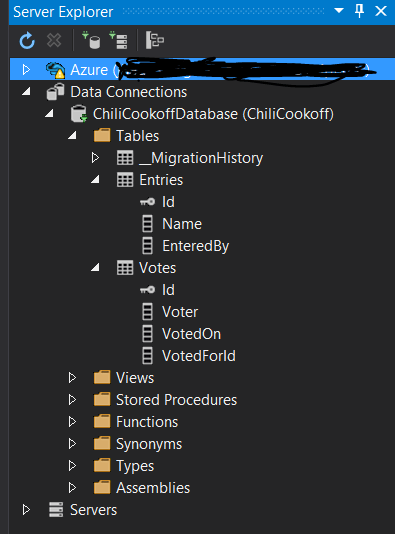
For now, we can see the database that was created by looking at the SQL Server database in the Server Explorer window. You’ll also note a table got created that we did not specify, __MigrationHistory. This is where Entity Framework tracks all the database model changes in your application.
Creating Relationships
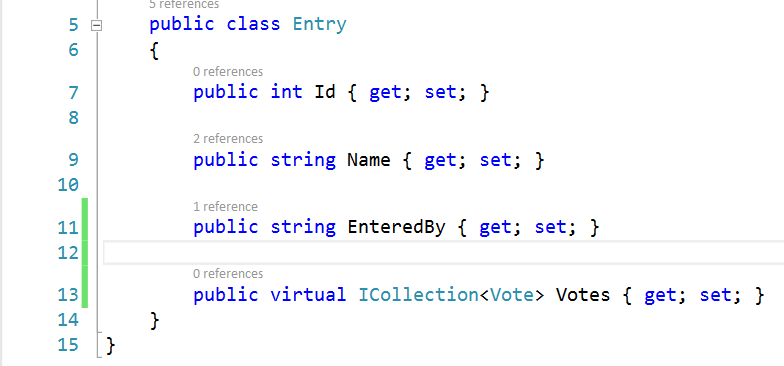
Code First can be used to create relationships in the database between tables including one to one, one to many, and many to many. We’ll change our entities to reflect a more real world example where a vote could be cast for a chili entry multiple times. To represent this in our model, we’ll add a navigation property to the Entry entity which will hold the Vote entities related to the Entry. We’ll also remove the VotedForId property from the Vote entity since that will no longer be needed. Note that the navigation property is defined using a virtual which will allow it to take advantage of lazy loading.
Saving Changes to the Database Model
If you try to build and run the application at this point you’ll get an interesting error as shown below.
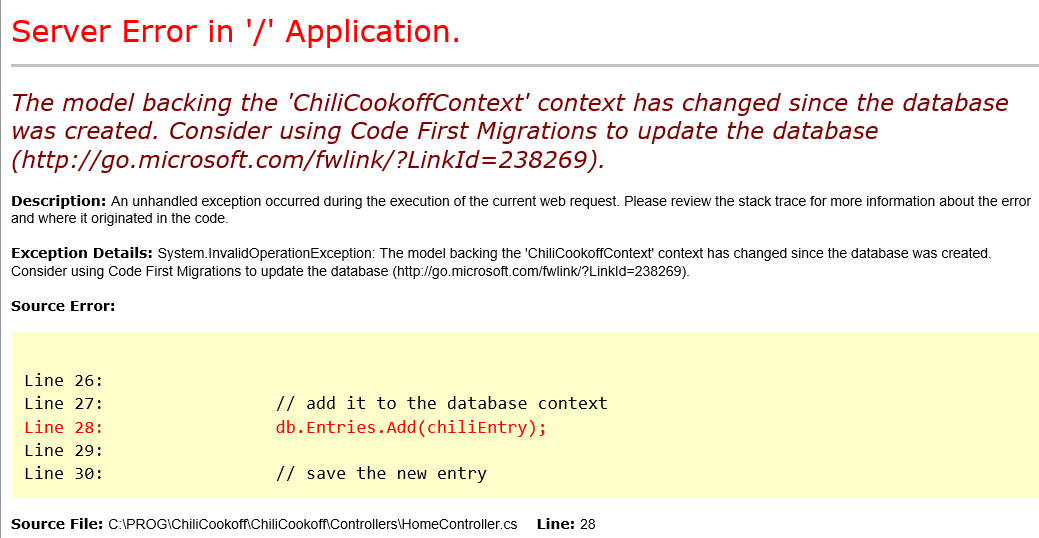
This error is occurring because we have made a change to the model but we have not updated the database schema. In order to update the database schema, we’ll need to use Code First Migrations which allows us to specify exactly what changes to make to the schema.
To use migrations, we need to enabled them by using the NuGet Package Manager console window.
- Go to the Tools menu, click NuGet Package Manager and then click Package Manager Console.
- Make sure your Default Project is ChiliCookoff.Data.
- In the Package Manager Console window type: enable-migrations.
If all goes well you should see a message similar to the one below indicating migrations are enabled for this project.

You’ll also notice a new folder called “Migrations” and a couple new files were created in your project. The Configuration.cs file contains the settings that the migration uses for modifying the database model. The other file that ends with “_InitialCreate” represents your current database model and is your first migration.
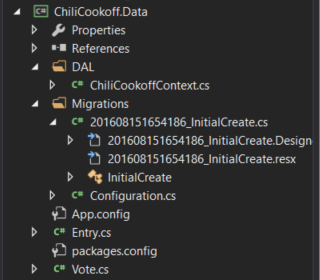
With migrations enabled, we can now scaffold the change we made to the Votes entity by typing in “add-migration votechange” in the NuGet Package Manger console window. Once the scaffolding is complete, you should see a new migration file that was created with the changes to Entries and Votes tables. Note the migration file has an Up and a Down method. This is used by migrations to make changes to the database (the Up method) and can also be used to revert those changes (the Down method).
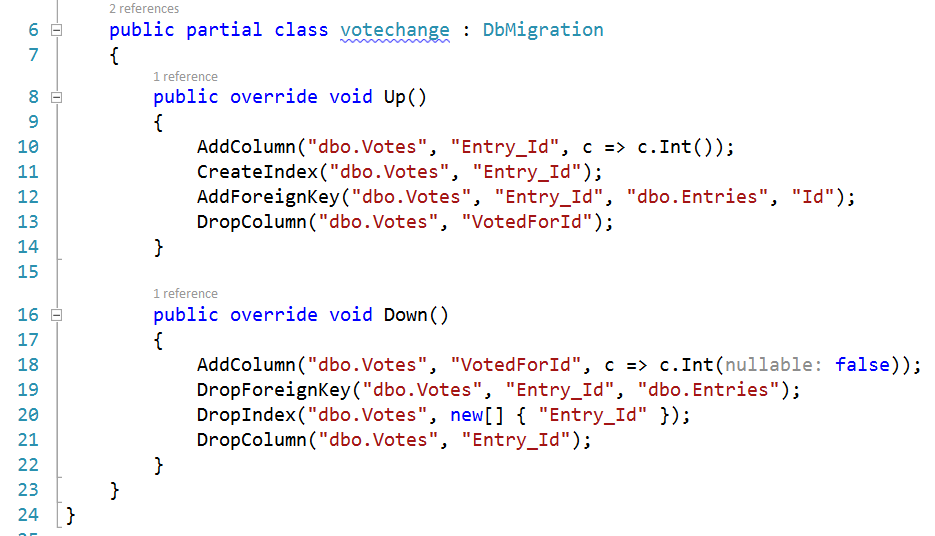
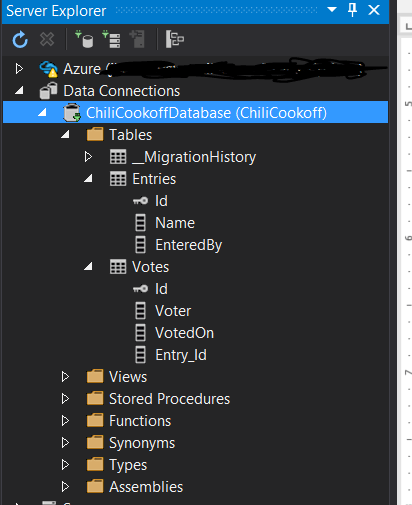
With a migration file in place you are now ready to update the database by typing in “update-database” in the NuGet Package Manger console window. If all goes well, you should see a message that indicates that migrations are being applied. You can check to see if the database model was updated by returning to the Server Explorer, right clicking on the database, and selecting Refresh.
Saving Data to the Updated Database Model
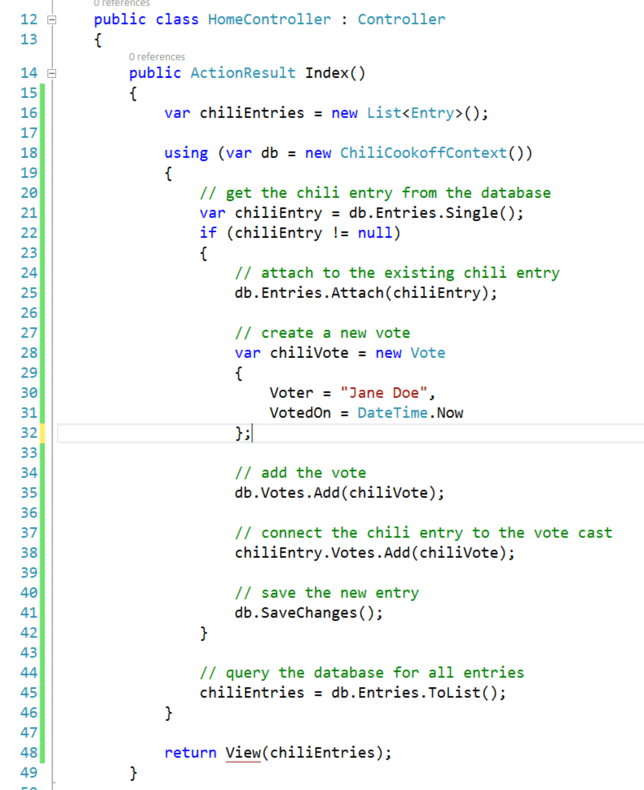
Now we’ll change the code in the HomeController to save a vote for our chili entry then display the vote. Replace the existing code in the HomeController with the code below.
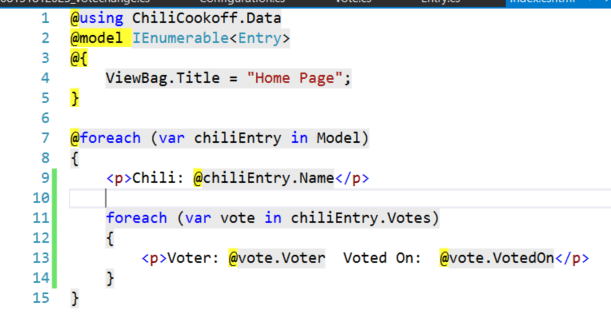
Next, we will change the Home Index.cshtml page to display the voter for the chili entry.
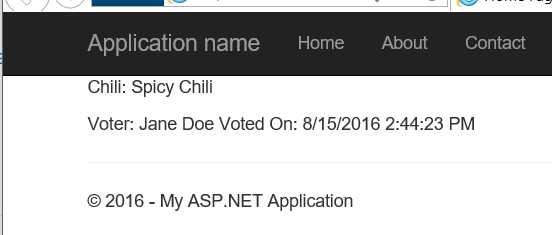
Now compile and run the application and you should see the entry and the one vote for the entry.
Fluent API and Data Annotations
Frequently when working with Code First, you will run into situations where the Code First conventions are not achieving what you desire. In this situation you can choose to use either the Fluent API or Data Annotations to override or extend the Code First conventions. As a rule of thumb I would try to stick with one or the other as it will make it easier to figure out your database model when you or someone else comes back to your project after initial development. My preference is Data Annotations as they decorate the entity class properties and it keeps your design in one place. Unfortunately, there are some things that cannot be done in Data Annotations or are done more easily in the Fluent API.
Fluent API
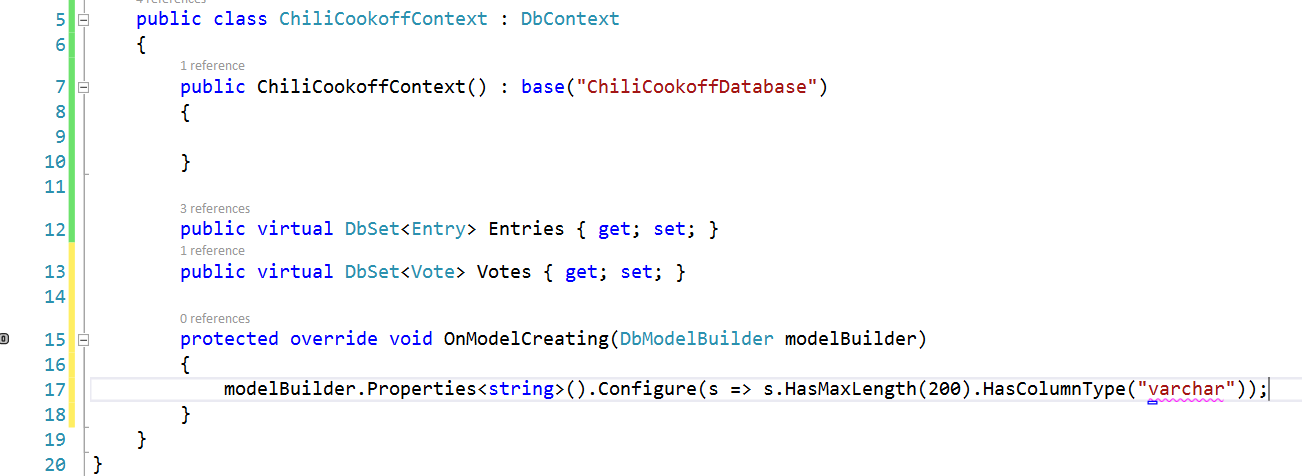
By default, Code First creates properties defined as string to NVARCHAR(MAX) in SQL Server. That’s a huge waste of space and can lead to performance problems in larger applications. So let’s override that using the Fluent API. Before you can start using the Fluent API, you’ll need to override the base OnModelCreating class. Once you’ve done that you can use the Fluent API to override convention. In the example below we’re using the HasMaxLenth and HasColumnType methods to force a maximum length of 200 characters for all VARCHAR columns in SQL Server.
Data Annotations
Let’s say we plan on having a search page of our chili entries that allows search by the name of the entry. That will present a performance problem if we have a large number of entries because the Name column in the Entries Table is not indexed (not to mention the Name column was defined as NVARCHAR(MAX) in SQL Server which we fixed using the Fluent API). To resolve this issue, we can use the “Index” Data Annotation as show below.
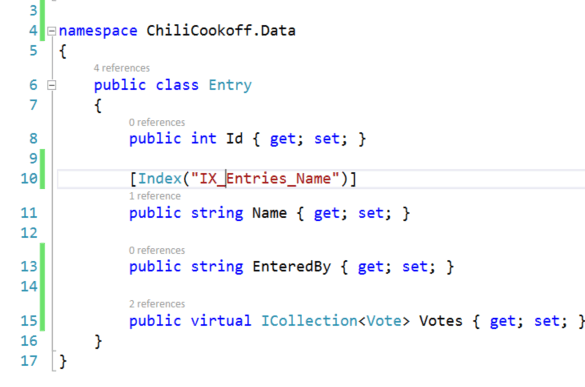
Naming the index is optional. If you do not provide an index name, by default Entity Framework will name it IX_<property name> but I prefer to have my indexes named in a specific patter of IX_<table name>_<column name>.
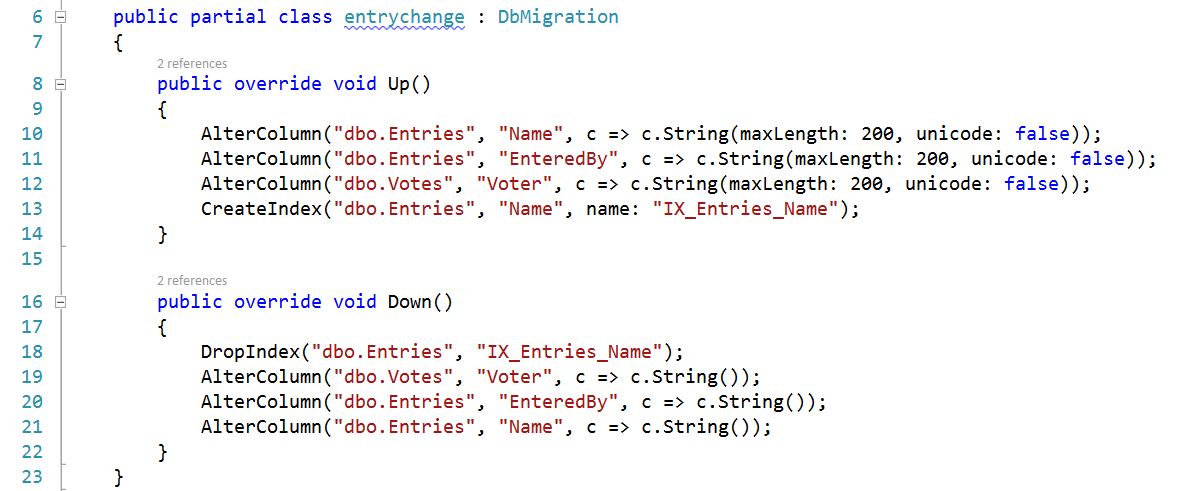
With the new attribute in place, let’s go ahead and scaffold the change by typing “add-migration entrychange. Once the scaffolding is complete, you should see a new migration file that was created with the string properties getting a maximum length of 200 and the name column getting an index.
These are just a couple examples of what you can do when the Code First convention does not meet your needs. For more information, check out the excellent Entity Framework Tutorial sections on Data Annotations and the Fluent API.
Helpful Tips
As great as Code First is you can run into some issues when using it in a team environment. If you have more than one team member creating migrations and checking those migrations into source control, you can easily get to a point where Code First is in an unusable state. To avoid this situation, I’d recommend having one person put in charge of the migrations and checking those into source control. This can be difficult especially early in the application design where the model is changing frequently. An alternative is of course good communication. When someone on the team creates a new migration and checks it in, they should immediately tell everyone on the team they have done so and everybody on the team needs to check out from source control and rebuild as soon as possible. For further reading on this check out Microsoft’s Code First Migrations in Team Environments article.
Despite following best practices, there may come a time when you run into a wall with Code First and nothing is working correctly. At that point it is sometimes better to hit the reset button than to try to unwind your migrations to determine where the problem lies. You can do this with what I’ll call the nuclear option because it requires deleting your database and all your migration files. Obviously, this should only be done early in development, not when you’re a week away from the start of testing.
- Backup the database and your migrations folder just in case.
- Delete the database.
- In the NuGet Package Manager Console window type in “enable-migrations -force” (do this only once and note this deletes the configuration.cs and any code for seeding data you have in there)
- Delete the Migrations folder from your project.
- Rebuild the solution.
- Recreate the database setting up any necessary accounts that got deleted when you deleted the database in step 2.
- In the NuGet Package Manager Console window type in “add-migration Initial” to scaffold an initial migration file from your entity classes.
- In the NuGet Package Manager Console window type in “update-database -force” to update the database.
Finally, despite the coolness of having your code create your database, sometimes you’d like to see your database model visually before it gets created. A helpful tool for doing this is the Entity Framework Power Tools. Note that despite it being a Beta it is a pretty stable release and does work well. Also note that the installation page does not indicate that Visual Studio 2015 is supported. You can find a workaround for that here.
Conclusion
Entity Framework Code First is a solid approach for any .NET application but especially new applications. The ease of turning C# classes into a database design makes it very approachable for developers who have limited database design experience.
